

How To Set Up A Tabletop Decorative Fountain
Fountain: How to Build a Physical Fountain
Updated: Jun. 30, 2017
Carving stone requires years of grooming, extraordinary skill and endless patience—or you can cheat and use power tools.
Create a stone-lined garden pond, and then carve a waterfall out of a block of rock using bones ability and mitt tools. The technique is uncomplicated, even for beginners.
You might also similar: TBD
- Time
- Complexity
- Cost
- Multiple Days
- Intermediate
- $101–250
Overview
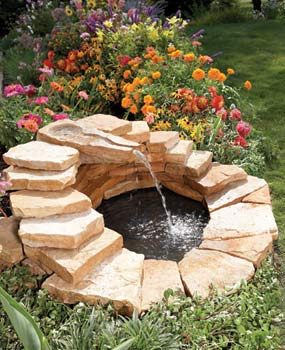
Fountain
Create a pond, and so cap it with a waterfall made from a hand-carved stone.
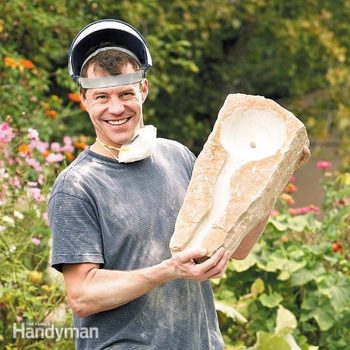
If you lot have a circular saw and an angle grinder, you tin can spend about an hr in a deject of dust and emerge with a carved fountain stone like this one. You won't demand whatsoever special talent, just a few tricks and a couple of diamond saw blades (see "Tools and gear" below).
A weekend is plenty of time to cleave the stone and create a pocket-size pond. Your masterpiece could look entirely different from the one I fabricated, depending on the shape of the rock yous choose. I purchased all the stone and spent about $200 on the whole project, but if you take admission to complimentary stone, you can cut that cost in half.
Selecting a stone
The 6-in.-thick sandstone block I used was most 9 10 twenty in. and toll about $15 at a landscape supplier. The stone you use tin be whatever size and shape as long as it has a flat spot that'south at least eight-1/2 in. beyond. The bowl itself will measure only over 6-three/iv in. across and ii in. deep.
Soft stone is best for this project. Although you can cut and grind very hard stone, it could turn this one-hour task into an all-day task. Besides avoid stone with strong "grain"—layers of harder and softer stone—because information technology tends to crack along the layers. That makes chisel work risky; one wrong blow can ruin your project.
Hardness and grain aren't e'er obvious from wait and impact. Then if yous selection upwards stone alongside the route, you won't know if it'due south workable until you try it. If you buy rock, exist sure to inquire for recommendations. In almost areas, sandstone and some types of limestone are your best bet.
Getting started

Photo 1: Mark the bowl and channel
Trace effectually a paint can using a black marker and so the circumvolve will show upward through a storm of grit. Sketch the channel with a pencil and so darken the lines with a marker.
Cutting stone whips up a dust storm—don't fifty-fifty think about doing information technology in your garage. Work as far away as possible from anything yous don't want coated with grit, especially open windows or your neighbour'south convertible. Take 5 minutes to set up up a sturdy work surface (I used a couple of sawhorses and 2×8 planks.) Yous'll get better results if you lot're working comfortably, and you'll save your back. If the stone wobbles on your work surface, steady it with shims.
Next, mark out the basin and channel (Photo 1). If you want a curving channel like ours, avoid tight curves; annihilation tighter than the curve of a one-gallon pigment tin will be tough to cut with your grinder. Make the channel nearly 1-i/2 in. wide and flare it to a width of ii-ane/2 in. at the bowl. The flare helps create strong h2o flow. The flare at the front of the channel is purely for looks.
Building the Fountain
This swimming is small—a 30 x 36-in. oval, about xiv in. deep. Edifice a pond couldn't be much simpler. Just dig a hole, line it with pond underlayment followed past an EPDM rubber liner and surround it with rock. Then build a elementary stepped-up wall to support the fountain stone. Here are some tips for a polish projection:
- Select larger flagstones for the first layer surrounding the pond. They stay put better and tin can overhang the edge of the hole past ii to 3 in. to hide the liner.
- Leave a small gap between 2 of the flagstones so you can feed the pump tubing through subsequently.
- The flagstone I used for the wall had flat faces that fit together adequately tightly when stacked. That allowed me to mucilage them together with polyurethane construction adhesive (run across Photo 8). If you use irregular rock, you'll accept bigger gaps and mortar would exist a amend choice. If you lot apply large stones, you lot may not need adhesive or mortar. Heavy stones stay put by themselves.
- The pump I used is rated for 210 gallons per hour. A smaller pump may take worked, but I've learned that it'southward amend to spend a lilliputian extra than to observe afterwards that a pump was besides small.
- Fifty-fifty if your pump has a built-in flow adjustment knob, consider adding a valve (run into Effigy B) for quicker, more than accurate adjustments.
- Choose your tubing before you drill the hole in the bowl (Photograph 7). Depending on the outer diameter of the tube, y'all need either a 5/8-in. or iii/4-in. drill fleck.
- The tubing I used fit snugly into a 3/four-in. hole. So I slathered the tube with silicone caulk, slid it well-nigh 1-one/2 in. into the stone and allow information technology set overnight. Don't insert the tube all the way to the top of the drilled hole. The larger bore of the drilled hole helps to dampen water pulsation caused by the pump.
Cut, chisel and grind the basin

Photo ii: Cut the basin like a pie
Make plunge cuts beyond the bowl outline. Hold the saw so that the forepart of the shoe is resting firmly against the stone. Then slowly lower the bract into the stone. Clothing eye protection.

Photograph 3: Break out the "pie slices"
Chip away the first few slices. After that, yous'll accept space to aim your chisel at the base of operations of each slice, and most will pop out with one blow.

Photo 4: Grind the basin smooth
Elevate the edge of the bike chop-chop and lightly across the basin. If y'all press too hard or hesitate, you'll create gouges that require more grinding to smooth over.
Fire up your saw and make the bowl cuts (Photo 2). When making plunge cuts, you take to keep an centre on both the front and the back ends of the blade to brand certain yous don't cut beyond the circumvolve. And remember that the spinning bract will try to drag the saw backward. If your circle disappears under a layer of dust, finish and blow off the dust. If you guesstimate where the line is and approximate incorrect, yous'll finish up with a lopsided bowl. Make at least viii cuts; the more cuts yous brand, the easier the side by side pace will be.
Next, chisel out the bowl (Photograph 3). If any of the slices don't break out easily, rev upwardly your saw once more. Improve to make more than cuts than to whack out a big piece and exit a crater in the basin. Grinding (Photograph four) is boring, but patience pays off in the grade of a shine, rounded basin. With very soft stone, like the sandstone I used, yous can polish the basin fifty-fifty smoother by mitt-sanding with 80-grit sandpaper.
Cut the aqueduct

Photo 5: Cut the aqueduct
Brand cuts along the edges and several in between. Cut in shallow passes, going gradually deeper with each pass. If you lot brand deep passes, the spinning bract will pull itself off course.

Photograph 6: Chip out the channel
Break out the slivers of stone to open up up the channel. And then rev upwards your grinder again to perfect the edge cuts and smooth the bottom of the channel.

Photograph seven: Drill a hole in the bowl
To avoid chipping around the edges of the hole, start with the drill's hammer action turned off. When the hole is about ane/2 in. deep, switch the hammer activeness on for faster drilling.
Cutting the channel as deep equally the diamond blade on your grinder will achieve (most vii/8 in., depending on your grinder). But the central to decision-making that spinning blade is to make all cuts in shallow passes (1/8 to i/four in.). Starting time by cutting the outer edges of the aqueduct. Don't worry about forming perfectly polish curves yet; if you lot take to class a rough curve with a series of short, direct cuts, that's OK. Next, cut grooves in the middle of the channel (Photo 5). Then chisel out the channel (Photograph 6). That volition open up up space to shine out the curved edges with the diamond blade, a grinding disc or a combination of both. When the channel is done, drill a pigsty in the bowl (Photo 7) sized to accept the tube from the pump.
Gear up the fountain stone
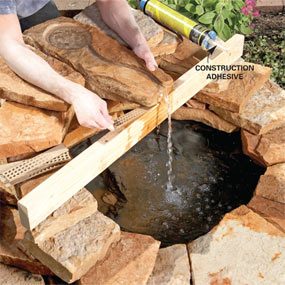
Photo 8: Ready the stone
Run the pump and arrange the stone until you get a strong stream. Shims and a 2×4 "bridge" hold the fountain rock in position until the adhesive or mortar hardens.
Positioning the rock takes some care. You have to adjust the flow from the pump, level and shim the stone from side to side then water doesn't spill out of the bowl, and tilt the stone slightly for a strong, spilling stream. When yous accept it right, remove the stone, apply a bed of mortar or generous beads of construction agglutinative, and reset the rock. Keep the two×4 bridge in place overnight. If water clings to the underside of the stone and runs back toward the stone wall, apply a dewdrop of articulate silicone caulk nether the front of the stone. The silicone "baste border" will forcefulness the water to drop off.
Tools and Gear
- To cut the bowl, yous'll need a standard round saw and a 7-in. diamond blade. Diamond blades tin can price $75 or more than. Only for this modest job, cheaper is better. I spent about $30.
- To polish the bowl, you'll need a pocket-size angle grinder and a grinding bicycle. Don't balk at buying a grinder simply for this project; you'll find other uses for it. If yous want to cut a curved aqueduct, you'll need a 4- or 4-1/2-in. diamond blade. Or y'all tin cut a straight channel with your round saw.
- I used a hammer drill to drill the hole in the bowl. Just a standard drill, along with a little actress patience, will practise the job if you're using soft stone. Use a masonry drill bit diameter that matches the outer diameter of the pump tubing.
- This project whips up a tornado of grit and grit, making a dust mask and center protection mandatory. Safe glasses volition do, simply I prefer a face shield. Those flying slivers of stone sting!
Required Tools for this Projection
Have the necessary tools for this DIY project lined up before you start—you lot'll save time and frustration.
Yous'll too need diamond blades for the round saw and grinder, a masonry bit to fit the hose diameter, and leather gloves.
Required Materials for this Project
Avoid last-infinitesimal shopping trips by having all your materials ready ahead of time. Here's a list.
Originally Published: June 20, 2017
Source: https://www.familyhandyman.com/project/fountain-how-to-build-a-concrete-fountain/
Posted by: scotttudith.blogspot.com
0 Response to "How To Set Up A Tabletop Decorative Fountain"
Post a Comment